
Authenticate users like a pro using Node.js, express and mongo DB
Create a smooth sign up and login functionality with complete security and authorization.


What is authentication?
So basically authentication is a process of authenticating the user by matching his/her credentials like username/email and password with credentials present in the database.
What actually happens in the authentication process?
We all are familiar with the signup and login functionality used on various websites. They usually ask us for the email or a unique username which then gets stored in the database which they are using to store and retrieve data. Once you enter your email or username then you have to create a password for security purposes.
So a million-dollar question - Do websites store the user's password in their databases?
The answer is of course yes they store the password of every user in their database, unless how they can compare it when you try to enter in the login process.
So you might have a question in your mind "What if a hacker or malicious user gets access to a database somehow ?"
Here comes the encryption part in action so the passwords get encrypted before saving them to the database. In node.js the encryption of passwords is done by bcrypt(library of npm). bcrypt is an encryption utility which is used to convert plain passwords or text into encrypted ones.
you can learn more about bcrypt here
What is authorization?
Authorization is the process of giving someone the ability to access a resource. This is done by authenticating the user first if someone has signed up on the website then asking him/her now to log in with the same username/email and password. If the credentials are present in the database then only the user will be authenticated. After authentication, the user is authorized for accessing the premium content of a website.
Enough theory let's see how to implement this thing on our own website.
So, first of all, you must be familiar with node.js, express and mongo DB if not then check out my blogs or any other documentation on it and watch some youtube tutorials to learn more about these things.
We need to install node modules and you know how to install node modules right?
(install express, bcrypt, mongoose)
after that create a server using express and allow express.json() like below.
const express=require('express')
const app = express()
app.use(express.json())

const port = 4000
app.listen(port,()=>{
    console.log('the server has been started');
})
Creating a database in Mongo DB
We have to create a database on MongoDB atlas so just follow any tutorial from youtube and create a database using mongo DB atlas.
Once you create you will get a connection string in it which then we will use in our app to connect with the database.
Let's see how can we connect the database to our application.
const express = require('express')
const mongo = require('mongoose')
const dotenv = require('dotenv')
dotenv.config({ path: './vars/.env' })

const app = express()
app.use(express.urlencoded({ extended: true }));


// note here I have stored the conncetion url in a .env file using environment variable
mongo
    .connect(process.env.LINK, {


    }).then(con => {

        console.log('connected with moongoses');
    })


app.use(express.json())
app.use('/App', RegisterRouter)
app.use(express.static('./Public'))
app.listen(2000, () => {
    console.log('yes the server has been started');


})
Like this, you can connect your database with the application (I used an environment variable to add my connection string(URL))
Building database schema
What is schema?
The design of the database is called a schema. This tells us about the structural view of the database. It gives us an overall description of the database. A database schema defines how the data is organised using the schema diagram.
Let's now actually implement the schema in our code
const mongoose = require('mongoose')
const validator = require('validator')
const userSchema = new mongoose.Schema({
    email: {
        type: String,

        required: true,
        unique: true,
        lowercase: true,
        validate: [validator.isEmail]
    },
    password: {
        type: String,
        required: true,
        minlength: 6,
    },
    passwordConfirm: {
        type: String,
        validate: {
            validator: function (el) {
                return el === this.password
            },
            message: 'the passwords are not same'
        }
    }
})

const Fields = mongoose.model('Fields', userSchema)
module.exports = Fields
Save this in a different file.
Creating the signUp and Login functions
The main work starts from here we have to create sign Up and login functions and we have to save the data in the database.
We will create a signup functionality like this
const Fields = require('./../Models/registerModle')


exports.registerUser =async (req, res, next) => {


    const newuser = await Fields.create({
        email: req.body.email,
        password: req.body.password,
        passwordConfirm: req.body.passwordConfirm
    })
    res.status(201).json({
        status: 'sucess',
        mssg: 'hey signed in sucessfully',
        user: newuser
    })


}
create() is the method used to create a new collection in a database.
and now let's create the login functionality
 exports.login = async (req, res, next) => {
    const user = await Fields.findOne({ email: req.body.email }).select('+password')
    if (!user) {
        res.status(500).json({
            status: 'failed',
            message: 'user not exists'
        })
    }
    if (req.body.password !== user.password) {
        res.status(404).json({
            status: 'failed',
            mssg: 'Incorrect password or email'
        })

    } else {
        res.status(201).json({
            status: 'sucess',
            mssg: 'You are logged in '
        })
    }

}
That's it we only have to send requests using postman and our sign-in and login functionality will work. We need a POST request to execute this request from a user.
You can connect these functionalities in a real-life website by using the fetch() method in javascript.
So when you do sign up then your data will get stored in a database like this.
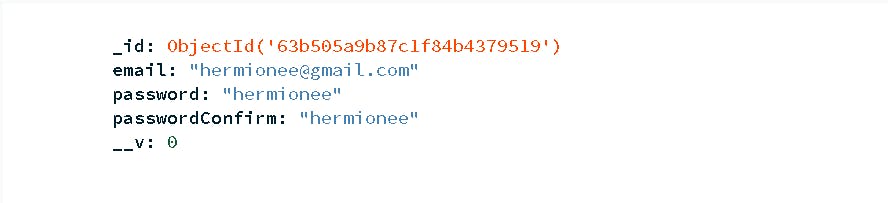
As you can see that the password is clearly visible if any hacker gets access to this database then he/she can use our credentials. The solution for this problem is bcrypt package which we discussed earlier. We have to encrypt the passwords in the database. Even if the hacker gets access to our database he/she will not be able to use our credentials because our password is encrypted by using bcrypt method.
Our database will look like this after encrypting the password

Security best practices
So we have created a simple login and signup functionality but there are many more ways that hackers can attack our system and there are some best practices for the security of a website or the authentication of a user.
Compromised Database
Strongly encrypt passwords with salt and hash (bcrypt)
Strongly encrypt password reset tokens
Brute Force Attacks
Use bcrypt (to make login requests slow)
Implement rate limiting (express-rate-limit)
Implement maximum login attempts
Cross-site Scripting (XSS) Attacks
Store JWT in HTTP-only cookies
Sanitize user input data
Set special HTTP headers (helmet package)
Denial of Service (DOS) Attack
Implement rate limiting (express-rate-limit)
Limit body payload (in-body-parser)
Avoid evil regular expressions
NoSQL query injection
Use mongoose for MongoDB (because of schema Types)
Sanitize user input data
What is a cookie?
a cookie is basically just a small piece of text that a server can send clients. Then when the client receives a cookie it will automatically store it and automatically send it back along with all future requests to the same server.